
fig. 35
fig. 36
If you are about to perform this mod, you didn't do the "Steering Spring Saver Mod (No. 12). If have no need to create a temporary Steering Spring, then DO the Steering Spring Mod now and save yourself future grief! This mod is here because I didn't listen to my own advice, and lost my Steering Spring.
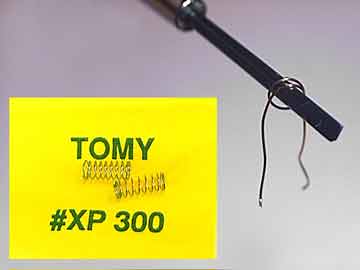
This mod requires a Tomy XP300 Micro Spring, a precision screwdriver, and a blade or wire cutter. Begin sliding the precision screwdriver through a one of the rings (coils) in the middle of the spring. (Not thru the spring, from one end to the other, but perpendicularly from the side). Now pull at one end of the spring and begin to straighten it out. Then straighten the other end. Once finished, you should have just the "one" coil around the shaft of the screwdriver, and two semi-straight "lengths" of spring. (see fig. 35)
Straighten as best as possible, then clip off the excess length. You should have the spring on the srewdriver the whole time it is being shaped, to avoid losing it. To adjust to increase tension, simply twist the straightened lengths around the screwdriver so that its default state has the two lengths crossed. To lessen tension, twist in the opposite direction. You may have to do this several times to achieve a tension equal to the magnets ability to steer. Too much tension negates the magnets strength, and your Bit will not steer.
The springs gauge is slightly larger than the stock spring, but much smaller than a VHS or Floppy Disk spring. (see fig. 36) It doesn't outperform the stock spring, but is a great working replacement until you can buy a real one, because its naturally "springy". Hehe. *Pun*
This is a great mod for carrying your Byte (your collection of Bits!). Go to your local fishing store and buy a tackle box, preferably a plastic cast one, so that you can cut and modify it to your liking.
The particular carrying case I have opens to identical compartments on both sides, and can hold 1 Byte (8 Bits) on one side, and another Byte on the other. The compartments depth was not deep enough to hold my controllers, so I cut through the bottom of one compartment, creating a section deep enough to hold 4 controllers. (see fig. 38)
I lined each compartment intended to hold a car with custom cut foam insulation, the type commonly found as packing material for hard drives or other sensitive electronic equipment. I created a special foam insert with holes to hold each of my motors. I created the holes using a holepuncher. (see fig. 39)
I cover each car with another custom cut foam layer on top to allow for the flipping-over of the case without damaging or tossing about my cars.
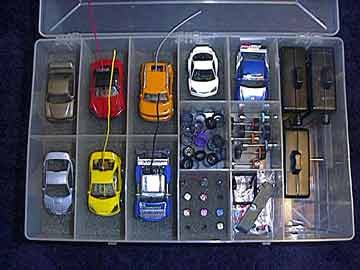
fig. 37
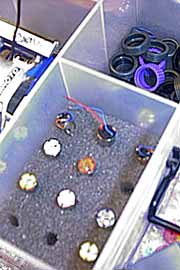
fig. 38 & 39
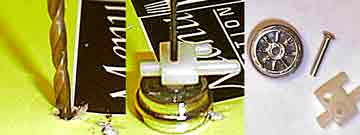
fig. 40, 41, 42
fig. 43 & 44
fig. 45
 19.
4 Wheel Drifting
19.
4 Wheel Drifting
This mod adds dimension to the Tomy drift axle by adding drift axles to all four wheels. The effect is increased control to your drift style driving. This mod requires plastic wheels for your front axles. I recommend using Tomy Bit Racer free-roller axles, but you can also use the plastic wheels off Hot Wheel type die cast toys.
Begin by dissasembling your steering well (front end). Remove your steering knuckles. Separate your wheels from the knuckles. To do this, drill a hole into an old phonebook, slightly larger than the diameter of the front axle pin head. (see fig. 40) Place the knuckle down with the axle pin in the hole. Using a precision screwdriver and a hammer, insert the screwdriver into the the axle shaft and slowly hammer out the pin from the back of the knuckle.(see fig. 41) Once removed, replace the original wheels with your new plastic drift wheels. You may have to shave down your wheels a bit if you want them to be flush with your body. Make sure your front drift wheels spin freely when reinserting your axle pins. Reassemble your car, snap in a rear drift axle and play!
A few tips on drifting... it is normal for your Bit to constantly pull to the right in donuts. A friends theory is that it is due to the motor gear being on the left side of the chassis. To overcome this, adjust your steering trim beneath the chassis. Also, when choosing a candidate drift wheel for the front, it might help to choose one that offers the least amount of contact surface area to reduce friction. Less friction in the front, allows the rear to gain traction, which in turn reduces spin, and gives you more control.
 20. Dual Antenna
This mod puts a simple "twist" on the "Car Antenna Upgrade Mod. No. 5". This mod is great for aesthetics, especially cars with two color paint schemes because you can match both colors! (see fig. 46)
Its best to use a smaller gauge like 26 gauge solid copper core wire, to reduce the combined weight of the two antennas, and reduce the stiffness. To do this mod, follow the steps in outlined in Mod. No. 5, but instead solder both wires to the PCB. Depending on the combined diameters of the copper cores, you may not be able to fit both wires into the hole provided for the antennas for soldering to the PCB board. Simply solder onto the contact area instead of through it. You can also run the two antennas separately instead of twisting.
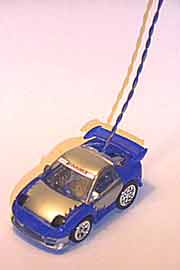
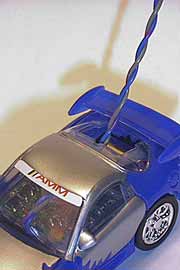
fig. 46 & 47