
fig. 25
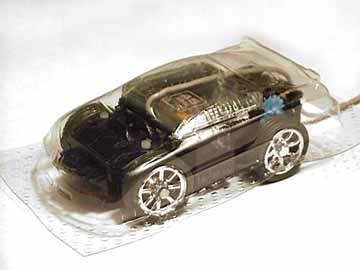
fig. 26
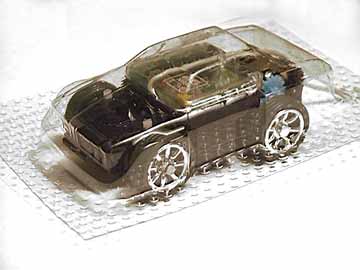
This mod uses the clear lexan bodies designed for slot cars.(See fig. 25 & 26). These bodies can be found at most hobby stores that carry HO slot cars. There are also hard plastic bodies for slot cars, but because slot cars have a longer length, the wheel wells do not line up well. Although this can be remedied with a dremel and putty, it is certainly much easier to cut custom wheel wells into the lexan ones.
Lexan bodies are also slightly longer than Bit bodies, so you have to find a way to mount them securely. But there are many ways to do this... Cut a slot in the rear just like the Bit bodies. Then drill a small hole thru the clear PCB cover, and run a small short machine screw with a flat head, from beneath. Make a small hole on the roof of the lexan bod that lines up with it. Fit the body over the slot and onto the screw. You can use a small nut to secure the body, but it isnt necessary.
You can also use the Bit Racer body adapters (the ones that allow Char-G bodies to fit Bit Racers) and attach it behind the motor well. ( See Mod. 09 - tailskid ). Dont use the guide bumper, use the other piece instead.


14. NiMH Battery Upgrade
( 25 Minute Runtimes )
This is probably the easiest mod, with the most visibly quantifiable results. All that is needed is a 1/3AAA NiMH battery, which is a non-commercial industrial dimension cell. Buy them here in our Online Store.
Your battery is located beneath your PCB (circuit) board. Remove the clear cover and carefully lift the PCB board up. Be sure not to pull the delicate copper wires. Remove your old battery with a precision screwdriver. Because the NiMH cell is about 1mm shorter than the stock NiCd, you must bend the terminals outward a bit for a solid connection. Use one screwdriver to pull the terminal (tab) forward, and use another screwdriver to push down on the top of the tab. (see fig. 28)
NiMH cells require a longer charge. 90 seconds (2 consecutive charges) for 20 minute runtime, and 135-180 seconds (3-4 consecutive charges) for a 25-30 minute runtime. On a Xanavi SE with a 2.2 motor, I have been able to achieve a whoppping 32 minute runtime on a 180 second charge. I must mention however, that the last 7-10 minutes have degraded performance as the charge winds down.
If you like this mod, try PRabbit's TurboBit Mod. He runs 2 NiMH batteries inline for a 2.4V power boost! This mod brings speed superior to a Digi-Q! Run it in full reverse, and then jam it forward, and it wheelies onto its back because of its tremendous momentum! Thank you Peter for inventing this one!

fig. 27
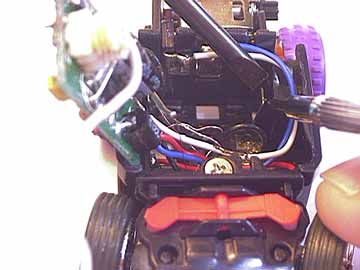
fig. 28
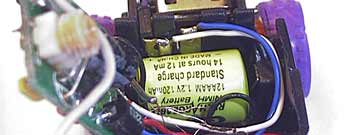
fig. 29
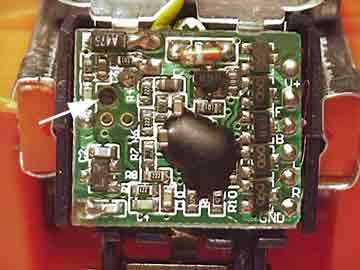
fig. 30 - top view
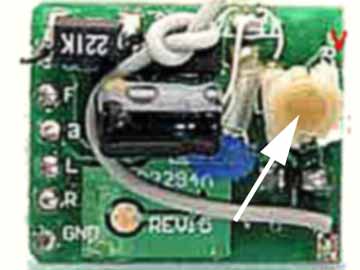
fig. 31 - bottom view
This mod fine tunes of your reception through the adjustment of your POTS (Potentiometer). If the term "POTS Mod" sounds familiar, its because it is common in many different electronic applications, from RC modeling to DJ Turntable adjustment, Auto Racing, and just about anything that uses a potentiometer. All this mod requires is a micro precision screwdriver (or preferably something similar to one that is not metallic), and a very light, steady hand.
Before you begin, you should realize that your car may already be tuned for the best possible reception, and your adjustments may actually weaken your reception. its best to mark your starting position, so that you may return the car to its original setting , if your tuning does not improve or worsens the cars reception. With that said, begin by having a friend stand with your controller to your cars maximum reception distance. Then insert the screwdriver into the POTS from the top, and align it to the slot inside. (see fig. 30) Turn the POTS to either the left or the right, in the smallest possible increments. Have your friend take a step back, then confirm the reception of the signal (by running the motor, or steering). Continue to adjust in small increments, and repeat the signal test with your friend until the maximum possible reception distance is achieved.
This is a fine tuning type of modification, and therefore may take several adjustments to accurately establish the best reception.
 16. Working Headlamps & Tail-lights
This mod uses high-output LED's to illuminate your Bit headlamps and/or tail lights. This mod requires some soldering. The details of this assembly depend on your Bit body type. For example, how many lights you wish to illuminate, choice of LED color, placement and wire length.You'll need the following:
- 2 3mm LED's (high-output LED's recommended)
- 26 gauge wire or thinner
- 3V Lithium button cell (1616/1620/1216)
- Heat-shrink tubing
- Copper contact strips or tabs
- Sub-micro slide switch
Begin by bending the prongs of 2 LED's at right angles, to allow the 'like' prongs to connect (short prong to short, etc). (See Fig.31) Use your Bit body to determine length. Solder the prongs of both LED's as well as the wire together, but before doing so, cut a piece of small diameter heat-shrink tubing, long enough to cover and reinforce the soldered area. Slide the tubing on before soldering. After soldering, shrink over the soldered area.
Next, solder one copper strip to the middle terminal of the sub-micro switch. Place the lithium cell between the 2 strips, cover with heat-shrink tubing and shrink (leaving the switch and other strip protruding out one side). Then solder the opposite end of 'one' wire from the LED's, to the strip not soldered to the switch. Solder the 'other' wire leading from the LED's to an empty terminal post on either side of the switch.
The switch sticks out the rear window. Bend the strip as necessary to allow the switch to angle up freely at a 45 degree angle. The tight quarters inside an the Bit body is usually enough to secure the light mod in place. You can use a glue gun to secure the lights to the underside of the body. Alternatively, you can drill 3mm holes thru the headlamps to permanently mount the lights. Secure using a dab of model glue or epoxy.
As an alternative reference, you can download the Tomy BitChar-Light Schematics in our Downloads Section.
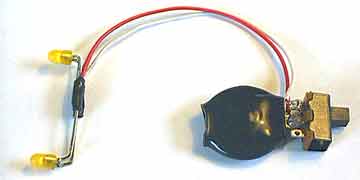
fig. 32
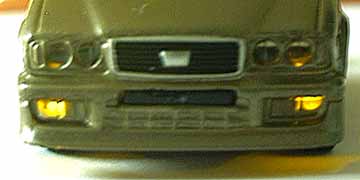
fig. 33
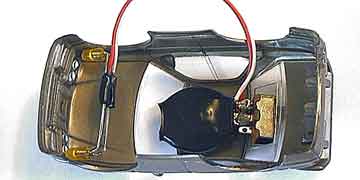
fig. 34