
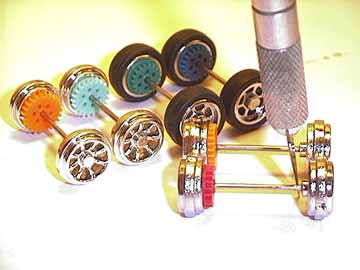
fig. 1
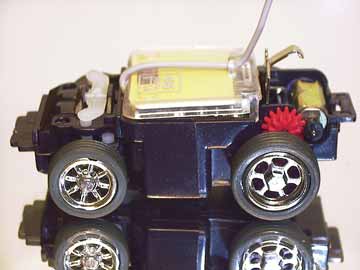
fig. 2


1. Using Bit Racer Axles
Stock Bit Racer axles DO NOT fit BitChar-G cars, although most online retailers including eBay advertise them as though they do. However modifying them to fit is quite simple. All you need is an exacto blade, S-02 accessory set, and your original BitChar-G axle.
Line up your Bit Racer axles with your stock orange Bit Char-G axle, and you will notice the Bit Racer axles have a longer spacer attached to the inside portion of the right rim (opposite the gearing). This is what keeps it from snapping in. Measure the proper amount needed to be trimmed. (see fig. 1) Take an exacto blade and cut the Bit Racer axle down to size to by simply rolling the blade back and forth over the spacer with pressure, in turn causing the axle to roll back and forth as well. (Its best to do this on a soft mouse pad, so the axle doesnt shoot out from under you). Then simply snip off the excess spacer "ring" that you've just created.
CAUTION: Since the gearing ratios are so high on the bit racer axles, you lose quite a bit of torque on take-off, thus your car will start off very slowly. It will eventually peak to a faster top-end speed. You must also use the white 7T pinion (motor) gear with the Bit Racer axles, in order for the axles gears to work.
Please Note: Photo bottom-left shows a black 6T pinion gear being used. This is because the car is using a motorola motor, which has a slightly different form factor. (See Fig. 2)
This mod simply puts a pair of stock rear wheels onto the front axles, for a complete set of matched wheels like real cars. This gives the car the effect of having a set of 20" rims (see fig.3).
This mod requires an extra set of axles, epoxy or model glue, 2 small washers, and taking apart your front end. Start by taking apart your extra axle, separating the rims and the gear from the axle. (Be careful not to bend anything in the process). Now drill a small hole the same diameter as the axle, throught the rear rims, using a dremel or drill.
Then disassemble your front end and remove your front axle steering knuckles (the white part that holds the rims). Remove the pins from the white steering knuckle, to remove the front rims. There is no easy way to do this, because the pins arent meant to be removed. The pins (axles) look like small nails with ridges at the tip to prevent them from coming loose. Replace the front rims with the rear rims, making sure they spin freely. Because the rear rim adjacent to the axle gear lacks a built-in spacer, you must insert 2 small spacers betw the knuckle and the rim (see fig. 4).
When reinserting the pins, they may no longer be secure especially if you widened the hole when removing it. To fix this, put a tiny, tiny drop of glue or epoxy into the hole from the opposite side of the steering knuckle! This is important because you risk gluing your rim in place by applying glue on the pin directly or on the rim side of the steering knuckle.
Please note: for great tips on how-to disassemble the the front end, visit ausmicro.com.

fig. 3
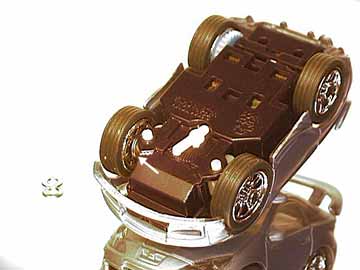
fig. 4
fig. 5

fig. 6

3. Lowering your BitChar-G
This mod lowers your car by replacing the rear rims with the smaller front rims, and dropping the front end by removing the sway bar. This mod requires an extra pair of front rims, 2 stock rear axles, a small nut, and epoxy or glue. For help on how to remove your front rims, see Modification No. 2 (fullsize wheelset).
Simply remove the sway bar to lower the front-end. This removes your suspension, but as with real lowriders, most suspension is diminished anyway. For an alternative method of front-end lowering with suspension, see Modification No. 8 (front springs).
Start by taking apart your extra rear axle, separating the rims from the axle (Be careful not to bend anything in the process). Leave the rim gear on the axle, as removing it damages it when sliding it over the ridges at the ends of the axle. Then take the bare axle and glue the left rim on. Place a dab of glue between the rim and the rim-gear to secure them together. On the other end, slide a some kind of spacer onto the axle before gluing the right rim on. This spacer is necessary to center the axle/rims properly. (See Fig. 6) Use a stock axle to measure the distances and spacing on your custom axle, to guarantee a proper fit.
Please note: Getting the spacer just right is tricky. I used a nut as a spacer (See Fig. 6), but I am sure there are other alternatives for spacers that will work. The nut I used didnt fit the axle snugly, so I epoxyed its center, then drilled the right diameter hole when hard. You can glue the spacer to the right rim, or leave it loose as I did.


4. Pager Vibrator & 3rd Party (Non-Tomy) Motors
This mod allows you to use the vibrator motor in old pagers and cellphones. This mod requires an old cellphone or pager. Although RPMs arent up to par with Tomy motors, the runtime on motorola motors are longer.
Take apart your old pager or cellphone and remove the motor. The motor is usually held in place with a clip. Simply snip or unsolder the two wires from the circuit board, then snap the motor out. Removing the weight on the motor is tricky. Use a cable splicer or wire cutter and place it between the weight and the motor. Squeeze only enough to hug the shaft. Rock the cutter back and forth, using the motor case for leverage. This should slowly force the weight up and off the shaft. Apply force sparingly, as the motor is easily damaged. If in the process the core snaps out, you can still salvage the motor, as long as nothing was damaged or lost. Simply snap the core back in.
Because BitChar-Gs use wireless motors, you must modify the motor first. Remove one wire from the motor, and replace it with a small flat dab of solder on the terminal, or you can also cut the wire to just 3mm, and remove the sleeve exposing the wire core. Solder the second terminal wire to the motors case, exposing 4-5mm of the core at the wires end by removing the sleeve. Since the wires are tiny, its easier to hold it over a flame for a second, and melt away the sleeve. Insert the motor into the car, with the wire soldered to the side facing downward, to make contact with the terminal below. (see Fig. 8). Make sure the solder stump is also making contact with the terminal on the side of the motor well. 3rd Party motors dont require mods. See pink and dark blue motor in (Fig. 7).
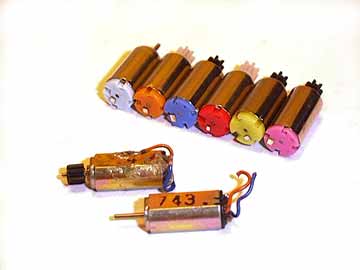
fig. 7
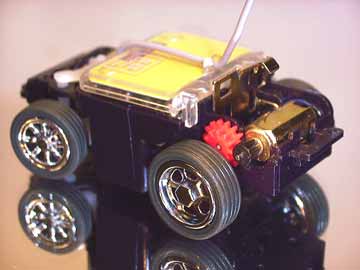
fig. 8